Cool Down with a Salad!

Summer is officially here and I try my best to cool things down in the kitchen when the weather heats up outside.  I like to have make-ahead sides that can be served at room temperature and often serve salads for dinner. Cooking in the morning before the weather really heats is a good way to beat the heat in the kitchen.  Here are the key components to a successful entrée salad.

  • A good base of GREENS: whether it be kale or Romaine or a mix of baby greens you need a base for your salad. Greens come in all flavors from mild to strong and provide the perfect back drop to a delicious salad.
  • Protein: Having a protein is key for turning a salad from a side dish to an entrée. I love grilled salmon on a salad or hard boiled eggs. Both of these can be made ahead to beat the heat at dinner time. If you really don’t feel like turning on the oven or stove, open a can of tuna or add some canned beans to your salad to provide protein.
  • Some Crunch: This could come from something as simple as toasted almonds or a crisp apple.  Adding some crunch to your salad gives it some texture and makes it more appealing to all of your senses.
  • Something Salty: If you are feeling simple, sprinkle your salad with some Jacobsen Salt Co. Flake Salt. If you want to dig deeper add a salty cheese or maybe some crushed tortilla chips or perhaps some salty meat like a cubed salami.
  • Something Sweet: I love putting some dried fruit on top of my salad… raisins & apricots are always a good choice. Candied nuts are a great option to add something sweet and crunchy!
  • Dressing: This could be the most important component of your salad as it provides lots of flavor to your meal.  I am partial to line of amazing dressings from Farmhouse Lab. I would say my favorite is the Berry Olive but the truth is I love them all.  A dressing should add flavor and bring all of the other components in  your salad into one dish.  If you prefer to keep your dressing simple, I would recommend FIVE Extra Virgin Olive Oil and FIVE Aged Balsamic Vinegar.

With these key components and a combination of your favorite fruits and vegetables you are sure to have a delicious salad on hand for dinner tonight.  The best part of having a really good salad for dinner is saving the leftovers for lunch the following day!

Happy Friday,

Julie

Fire up the Grill!

Fire up the grill!

Who doesn’t love to grill…especially on a warm sunny day, am I right?  At my house I typically do the cooking but my husband is always in charge of the grilling.  It isn’t that I don’t know how to grill, it is just that he likes it and it is an easy task for me to delegate to him.  In the city, we have a grill as part of our Wolf Range which isn’t quite as romantic as grilling outside (but better than not grilling at all).  When we go on vacation, we always rent a house with a grill.  On those instances I am pretty sure my husband loves being outside by the grill, sipping glass of wine and enjoying the weather. 

With Memorial Day Weekend starting, summer has un-officially begun and that marks the start of grilling season for most.  When I grill a protein I typically don’t follow  recipe.  The meat or fish is seasoned with one or more spice blends from La Boîte and some kosher salt.  For side dishes I tend to be more of a recipe follower.  Here is one of my favorite grilled side dishes. I first started making this when I lived in London and we had a charcoal grill on our roof top.  I hope you enjoy it as much as I do.

Happy Friday,

Julie

Grilled Romaine Salad

Makes 4 servings

Ingredients

2 heads Romaine Lettuce

1 red onion

2 ripe avocados

1 pint grape tomatoes

Olive oil

Salt and Pepper to taste

Method

-Pre-heat grill to medium high heat. While the grill is heating prepare the vegetables.  Slice the heads of Romaine in half from the stem to the tip.  Peel and slice the onion into ¼ inch slices.  Season lettuce and onion with olive oil, salt and pepper.

-Place onion slices on the grill away from the direct heat.  Allow to grill for about 20 minutes or until no crunch remains.

-Place lettuce on grill and allow to cook for 3-4 minutes per side.

-Slice grilled lettuce into 1-inch ribbons and put into salad bowl.  Chop grilled onion and add to the bowl.

-Slice the grape tomatoes in halve and add to the bowl.  Dice the avocado and add it to the bowl as well.

-Drizzle with a little more olive oil and salt and pepper if desired.  Toss to coat and enjoy.


It’s National Pretzel Day

To celebrate National Pretzel Day today I have to share this recipe from Julie’s Eats and Treats for Chocolate Dipped Peanut Butter Pretzels. I found it on Pinterest a few weeks ago and am just looking for an excuse to try it out.  I’ll be using Cacao Prieto Almond and Salt Bark for the chocolate bark!  If you try the recipe let me know how it goes!

Happy Friday,

Julie

Chocolate Dipped Peanut Butter Pretzels

Makes 6-8 servings

Ingredients:

1 cup creamy peanut butter

2 tablespoons butter, softened

½ cup powdered sugar

¾ cup brown sugar

Mini Pretzels

1 bar Cacao Prieto Almond and Salt Bark

Method:

-Line a baking sheet with wax paper and set aside.

-Mix peanut butter and butter together with a mixer until combined. Add the sugars and beat until combined.  You should be able to roll the mixture into balls without it sticking to your hands.  If it is still sticky, add more powdered sugar to reach the desired consistency.

-Roll the mixture into balls. Sandwich the balls between two mini pretzels.  Place in the freezer for about 30 minutes.

-Chop the chocolate into small pieces.  Melt in a double boiler, stirring occasionally until smooth. 

-Dip each pretzel sandwich into the mixture and place onto the prepared baking sheet.  Let set  at room temperature and store in an air tight container.

Dunk and Dip

We’re about a quarter of our way into the first weekend of March Madness and I’m looking forward to seeing how the brackets unfold.  I grew up in a household where we supported Purdue University and remember going to lots of Purdue Basketball games at Mackey Arena. I was a season ticket hold through my 4 years of college. Today, I’m embarrassed to say that I cannot name one player on the Boilermaker team but that doesn’t keep me from cheering for them in this whirlwind of basketball madness.  They are the #3 seed and played Old Dominion last night in the first round. I have yet to check to see who won… the game started at 9:45pm and there was no way I was going to stay up until the end.  Purdue should have won but they always manage to mess up in this tournament.

Hopefully I’ll be able to sit back and watch some more basketball this weekend and in the coming weeks as we look to see who will be number one.  While it is fun to watch my Boilermakers play, I am not too particular on who the 2 teams are.  What I am particular about is what I’ll be snacking on while I’m watching.  In honor of March Madness and National Chip and Dip Day tomorrow please find below two of my favorite chip and dip recipes. One is so simple and the other not quite so, but I guarantee both are crowd-pleasers and pair great with just about any kind of chip out there.

Happy Friday,

Julie

Sour Cream and Onion Dip

Ingredients:

16oz sour cream

1 packet onion soup mix, such as Liptons

Method:

-Mix sour cream and onion soup mix together until combined.  Serve with your favorite chips.

Spinach & Artichoke Dip

Ingredients:

8 oz cream cheese

2/3 cup sour cream

1/3 cup mayonnaise

1 ½ cups grated mozzarella cheese

½ cup shredded parmesan cheese

½ cup grated Gruyere Cheese

10 oz frozen spinach, defrosted and squeezed dry

1 can artichoke hearts, chopped

Method:

-Preheat oven to 375°F. 

-In a large bowl combine cream cheese, sour cream and mayonnaise. Mix with a hand mixer until light and fluffy.

-Stir in Parmesan Cheese, 1 cup Mozzarella Cheese, Gruyere Cheese, spinach and artichokes.

-Place in a 9 inch square baking pan and top with the remaining Mozzarella Cheese.

-Bake 25-30 minutes or until mixture is browned and bubbling.

-Serve with our favorite chips!

Recipe vs. No Recipe

I’ve always loved to cook. I grew up in a family that cooked. I have very fond memories of working together with my grandmother, mother and sisters to put together a Hanukkah celebration at the St. Louis Botanical Garden.  I have fond memories of making pies late on Christmas eve with my dad and sisters.   Most of my cooking memories when I was younger involved family and the holidays. My sisters and I also used have what we called ‘gourmet lunch’ on occasion. Looking back I realize this was a way for our babysitter to get us to prepare lunch but we loved it.  Everyone drew a course and went to work making something for the group with whatever was available in the kitchen.  It was a Food Network Chopped before that came around.  Some of the dishes worked and some of the more creative ones weren’t quite as delicious or edible!  As I got older(high school age) and could cook by myself, my mom often asked me to help with dinner. I loved that being in the kitchen but what I didn’t love was following a recipe. I wanted to be creative, not measuring and following directions.

I love cookbooks for their delicious stories about food and the ideas they provide for mixing new ingredients together. Check out our Pinterest Board for some of our favorite cookbooks. Unless I am baking, I typically use recipes as a guideline for flavors and quantities but allow myself to stray.  I learned a great lesson from my son’s teacher last year… Once you have done something the right way (i.e. followed the recipe or built the Lego kit the way it is intended to be built) you can do it in a new way.  This is a great lesson for a three-year-old and for grown-ups. Then I came across this great article in the New York Times by Sam Sifton, You Don’t Need a Recipe.  In the article Mr. Sifton describes guidelines for cooking a certain dish but not a strict recipe.  He points out that it takes practice to have the confidence to execute a dish without following a recipe but we can all get there if we try. I got some great ideas from the flavor profiles he outlined and signed up to receive the What to Cook Newsletter and get no-recipe ‘recipes’ sent to my inbox each week.

I cook dinner 6-7 nights a week at my house so I am always looking for inspiration on what to bring to the table.  Some of the dishes will be winners with my family and some won’t; that is all part of the process. Follow our Instagram account(@juliesbeet) and check out our stories to see what I am cooking most nights of the week. When a dish works out, I often publish a recipe in the form of an Instagram post or place it in the Recipe Box on the Julie’s Beet Website.  I hope you’ll follow along! 

Happy Friday,

Julie

On top of Spaghetti…

all covered with cheese, I lost my poor meatball when somebody sneezed!

In honor of National Meatball Day tomorrow, I did some research on the origin of the meatball.  As with most culinary successes the origin is a bit unclear.  While meatballs can often be found in spaghetti and meatballs in the United States, when served in true Italian style they are smaller and typically come without pasta or sauce.  Many believe the true origin of the meatball is from Kofta,  a dish of ground meat mixed with lentils or rice.  Kofta is said to have started as a Persian dish and then was passed along to the Arabs.  The popularity of the meatball perhaps spread north through Europe along with the spice trade.

While the origin of the meatball can be debated, one thing is certain, meatballs are popular in cuisines across the globe.  From Spanish Albondigas to Swedish Meatballs, Kofte from India to Morocco and Polpette in Italy; meatballs are everywhere.  Perhaps this is because of the ease of making a meatball. It is a great way to use of up leftover meat and vegetables and meatballs are easily flavored with a blend of spices.  Not only are they easy to make they are easy to make in large quantities and serve to a crowd… probably why most of us think they are an Italian dish.  Whether you prefer beef in your meatballs or take a more vegetarian approach, I hope you’ll enjoy these recipes and have fun celebrating National Meatball Day!

Happy Friday,

Julie

Traditional Meatballs

Makes 6 servings

Ingredients:

2 lbs. Ground Beef

1 small zucchini

3 medium sized carrots, peeled

1 small onion, peeled

3 tablespoons olive oil

salt and pepper to taste

2 cups Due Cellucci Tradtional Tomato Sauce

Method:

-Grate Zucchini, Carrots and Onion

-Over medium heat, heat olive oil in large saute pan.  Add the grated vegetables and cook for about 5 minutes(until vegetables are soft) stirring occasionally.  Allow to cool.

-Preheat oven to 350 degrees F.

-In the 9×13 inch baking pan, mix together the ground beef, vegetables, salt and pepper.  Form into ping-ping size balls and line up in the pan.  Once all of the mixture has been formed into the meatballs top with Tomato Sauce.  Cover entire pan with aluminum foil.

-Baked in preheated oven for 30 minutes.  The sauce will be bubbling and the meatballs cooked through.

-Serve immediately or see my tip above and chill for the next day.

-To reheat simply place in 350 degree F oven for 15-20 minutes.

-Enjoy with more sauce over pasta or choose spaghetti squash if you are into the low-carb thing!

Lentil ‘Meatballs’

Makes 4 servings

Ingredients:

¾ cup green lentils, uncooked

¼ cup red quinoa, uncooked

1 tbsp ground flaxseed

3 tbsp water

¼ cup sunflower seeds, ground to a fine powder

½ cup minced yellow onion

½ cup old fashioned rolled oats

½ tsp garlic powder

2 tsp Italian seasoning

¼ cup fresh basil, finely chopped

¼ cup fresh flat leaf parsley, chopped

1 tsp kosher salt

Pepper to taste

Method:

-Cook lentils and quinoa, separately, according to package instructions, then let cool

-Combine ground flaxseed with water

-Preheat oven to 375 degrees and line baking sheet with parchment paper

-Add cooked lentils, cooked quinoa, oats, ground sunflower seeds, onion, basil, parsley, Italian seasoning, and salt and pepper into the bowl of a food processor and pulse to combine. Add in flaxseed and water mixture and pulse to incorporate

-Using a 2 tablespoon scoop, scoop mixture and roll between palms into uniform balls. Place on baking sheet  

-Bake for 15 to 20 minutes, flipping halfway through, or until golden brown

-Enjoy with Semolina Artisanal Strozzapreti Pasta and Due Cellucci Spicy Arrabbiata Sauce

For the Love of Cooking

I love cooking and my favorite part of cooking is watching someone enjoy what I made for them.  I think that is why I had such a difficult time working in restaurant kitchens.  I was cooking plenty of food for the guests to enjoy but unfortunately wasn’t getting to see the smiles on their faces when they enjoyed it.  Granted I never worked in an open kitchen but I think that would have come with it’s own set of challenges.  One of my favorite jobs was working at Rococo Chocolates and running their chocolate school. I got to interact with people, teaching them how to make chocolate and other recipes with chocolate in them. I also got to see them enjoy the chocolates! 

My husband’s birthday was last week and we have Valentine’s Day coming up next week.  I typically cook him a special meal for his birthday and then again on Valentine’s Day.  It can be tough to figure out two amazing meals to cook just weeks apart as I try to make them completely different but still filled with the foods he loves.  One of his favorites is when I make pasta from scratch, I’m talking the actual noodles here.  Tonight we’ll be celebrating his birthday with a belated birthday dinner and I’ve decided to make some pasta.  I use the recipe from Thomas Keller’s French Laundry Cookbook.  It comes highly recommended from two chef friends of mine and always turns out perfect.

I found some recipe inspiration from Instagram on the feed @howsweeteats  I’ll be making the Cozy Lemon Pasta.  You can find the recipe here, And I’ll put the pasta recipe for you down below.  I cannot wait to see the joy on my husband’s face when he digs into this delicious meal.  A dream come true!

Happy Friday,

Julie

Pasta Dough

From Thomas Keller’s The French Laundry Cookbook

Ingredients:

1 ¾ cups all purpose flour

6 large egg yolks

1 large egg

1 ½ teaspoons olive oil

1 tablespoon milk

Method:

-Mound the flour on a board or other surface and create a well in the center, pushing the flour to all sides to make a ring with the sides about 1 inch wide.  Make sure that the well is wide enough to hold all  the eggs without spilling.

-Pour the egg yolks, egg, oil and milk into the well.  Use your fingers to break the eggs up.  Still using your fingers, begin turning the eggs in a circular motion, keeping them within the well and not allowing them to spill over the sides.  This circular motion allows the eggs to gradually pull in flour from the sides of the well.  It is important that the flour not be incorporated too rapidly or your dough will be lumpy.  Keep moving the eggs while slowly incorporating the flour.  Using a pastry scraper, occasionally push the flour toward the eggs; the flour should be moved only enough to maintain the gradual incorporation of the flour, and the eggs should continue to be contained within the well.  The mixture will thicken and eventually get too tight to keep turning with your fingers.

-When the dough begins thickening and starts lifting itself from the board, begin incorporating the remaining flour with the pastry scraper by lifting the flour up and over the dough that’s beginning to form and cutting it into the dough.  When the remaining flour from the sides of the well has been cut into the dough, the dough will still look shaggy.  Bring the dough together with the palms of your hands and form it into a ball.  It will look flaky but will hold together.

-Knead the dough by pressing it, bit by bit, in a forward motion with the heels of your hands rather than folding it over on itself s you would with the bread dough.  Re-form the dough into a ball and repeat the process several times.  The dough should feel moist but not sticky. Let the dough rest for a few minutes while you clean the work surface.

-Dust the clean work surface with a little flour. Knead the dough by pushing against it in a forward motion with the heels of your hands.  Form the dough into a ball again and knead it again.  Keep kneading in this forward motion until the dough becomes silky smooth.  The dough is ready when you can pull your finger through it and the dough wants to snap back into place.  The kneading process can take anywhere from 10 to 15 minutes.  Even if you think you are finished kneading, knead it for an extra 10 minutes; you cannot over knead this dough.  It is important to work the dough enough to pass the pull test; otherwise, when it rests, it will collapse.

-Double-wrap the dough in plastic wrap to ensure it does not dry out.  Let the dough rest for at least 30 minutes and up to one hour before rolling it through the pasta machine.  The dough can be made a day ahead, wrapped and refrigerated; bring to room temperature before proceeding.

Classic Meatloaf, Amplified

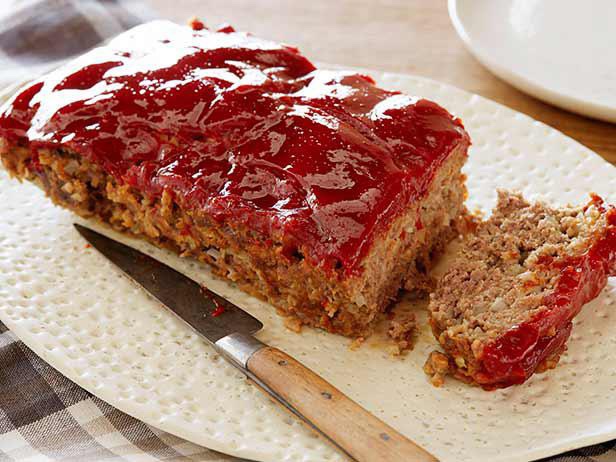
Growing up in the Midwest, meatloaf was a staple comfort food during the long and cold winter months. The combination of ground beef, sweet onions, bread or crackers, salt, pepper, and a sweet and tangy ketchup glaze seems to make every midwesterner that I know very happy during the winter time. I feel that it is almost customary that every midwestern mother has her own meatloaf recipe, or at least her own unique addition or adaptation of one. In my house, my grandma Carolyn’s meatloaf recipe reigned supreme, and no matter how hard my dad and I tried, regardless of the step-by-step handwritten instructions given to us by my grandma, our meatloaf never seemed to taste as good as hers… she just has the magic touch in the kitchen, where muscle memory and eye measurements outperform numerical metrics.

Whether served hot right out of the oven, or cold between two slices of buttered bread, a basic meatloaf comes together in minutes and provides the hearty and stick-to-your-ribs satisfaction that most individuals crave during the winter months. I no longer eat meat, and I haven’t for years, but I vividly remember the delicious comfort that meatloaf provides, a comfort that is both filling and warming, as well as nurturing.

In hopes to provide you with the best possible meatloaf recipe, I called my grandma this afternoon to request verbal instructions of her exact procedure. Of course, as mentioned above, she reiterated that she relies only on sight rather than measurement, but she was able to provide me with a quantifiable recipe that is similar to hers. Thankfully, it’s quite easy, as any meatloaf recipe should be, containing only a handful of simple ingredients. Of course, because I can never leave well enough alone, I’m going to swap out saltine crackers for The Matzo Project Salted Matzo Crackers and Heinz Ketchup for D.a.T. Ketchup which I think will provide a more unique and complex flavor, as D.aT. Ketchup boasts a few additional spices that Heinz Ketchup doesn’t contain. I’m leaving everything else alone, so please rest assured that this meatloaf will be nearly as good as my grandmas.

First things first, it’s all about the beef. Not all ground beef is created equal as it can contain various amounts of fat, so when choosing ground beef for your meatloaf, choose something with a higher fat content to insure that your meatloaf doesn’t get too dry during the cooking process. 70/30, which is the ratio of lean meat to fat, is a good choice, as the higher fat content will keep your meatloaf moist as well as add additional flavor and richness. Second, a ketchup glaze is key. A tangy and sweet glaze is not only delicious, but is also needed to cut through the fatty richness of the meatloaf rounding out the flavor to make it even more palatable. Lastly, chose your additions wisely, as simplicity lends to the best final result.

I hope you all have had a wonderful start to the new year! Cheers to lots of love, laughter, hugs, happiness, and of course, delicious food this 2019!

Happy Friday, everyone!

Classic Meatloaf, Amplified

Ingredients:

1 lb 70/30 ground beef

1 c crushed Matzo Project Salted Matzo Crackers

1 c minced white onion

1/2 c whole milk

1 large egg, whisked

1 tsp kosher salt

1/4 tsp ground black pepper

1/8 tsp ground nutmeg

2 tbsp D.a.T. Ketchup

Glaze:

1/4 c D.a.T. Ketchup

2 tbsp packed brown sugar

1 tbsp white vinegar

Method:

-preheat oven to 350 degrees

-to a large mixing bowl, add ground beef, crushed crackers, onion, milk, egg, 2 tbsp ketchup, and seasonings. Mix until just combined, being careful not to overwork the meat

-gently compress meat mixture into a 9”x5” loaf pan

-meanwhile, combine 1/4 c ketchup with brown sugar and vinegar and then spread on top of meat mixture

-bake for 1 hour, uncovered, and then remove from oven and allow to rest for at least 15 minutes before slicing

Enjoy!

Spooky Tricks and Treats

Trick or Treat?  Here’s a good one… “How do you get a tissue to dance?”  “You put a little boogie in it!”

The last weekend in October means that Halloween is near.  Whether you are trick or treating or handing out candy or heading to a costume party, dressing up is one of the really fun Halloween traditions.  I particularly love Halloween in New York City because there are many instances when you aren’t quite sure if someone is dressed up or not. Does that person really like a pointed black hat or are they dressed up like a witch? Is that a fashion statement with the stripes and polka dots or is that a clown? Someone dressed in all black with white gloves could be a mime or could just be headed home for the night.  I try to DIY my children’s costumes for the most part and this year is no exception.  This weekend I’ll be working diligently to complete our Disney Cars themed costumes using paint, old boxes and the art skills I wish I had!

While I am hard at work getting our costumes in order I’ll be dreaming about what kind of sweets we will indulge in.  Halloween is a pretty good excuse to consume large amounts of sugar but it doesn’t all have to be junk.  Check out this recipe for Caramel Apples with Lucy’s Granola Toffee Crumbles & Rococo Chocolates Chocolate Shavings. Growing up my mom always made(and probably still does) pumpkin cookies filled with oatmeal, chocolate chips and raisins.  When I was little we would decorate them with orange frosting and use more chocolate chips, raisins and candy corn to turn them into jack-o-lanterns.  Now I realize these cookies are pretty delicious without the added sweetness. I’m sure I’ll sneak a snickers bar or two from my kids stash when they go to sleep on Halloween but for the most part I try to stick to the good stuff.

Once Halloween is over we’ll be full-on into pumpkins and turkeys for Thanksgiving. I am going to enjoy the last weekend of sweet Halloween bliss before the Holidays get into full swing.

Happy Friday,

Julie

Fall is for making SOUP!

I spent the past week in my hometown of Spring Grove, Minnesota for a lovely little country escape to recharge my batteries — I love returning home and being surrounded by my family. While home, I got to attend three of my sisters senior volleyball games, which was so special to me, as I absolutely adore living in New York, but I really dislike missing out on witnessing my siblings grow up. My sister’s team won all three of their games, ending their regular season matches ranked number two in their state division. If the girls keep playing as well as they have been, hopefully I’ll be able to fly back to Minnesota and watch them play in the state tournament — fingers crossed!

It was unusually cold in Minnesota during my time at home, and it even snowed on Sunday, which although I despise the cold, it was beautiful to look at and made for the perfect day of baking and cooking in a warm kitchen. I made pumpkin cinnamon rolls which I mentioned a few blog posts ago, chocolate chip espresso cookies, as well as several different types of soup during my week long stay. I also had the distinct opportunity of having my wisdom teeth removed during this trip as well, so soft foods, or moreover soup for every meal, was essential. Sadly, said soft foods didn’t prevent me for developing a dry socket, but that’s neither here nor there.

I love soup, especially during the colder months, because it’s quite easy to make, and you can add almost anything to a soup, as it’s quite forgiving. There is really nothing like a warm bowl of soup on a cold winter day or night to bring a sense of warming comfort to your body. I like soups and stews in all forms, flavors, and variations, from thin and brothy to thick and chunky — I will never say no to soup, especially if loaded with crackers and served in a bread bowl.

I had my wisdom teeth removed the day after I flew into Minnesota, so in an effort to be prepared, I made myself a big pot of butternut squash and cauliflower soup — because I could only eat soft foods, I wanted something that was smooth and creamy, but also hearty. This soup was quite simple to make, as I used roughly 10 ingredients, and it took less than an hour to complete.  I started by sweating onions and garlic in avocado oil with a generous pinch of sea salt and ground black pepper, followed by a pinch ground ginger and nutmeg to bloom the spices — when using dried herbs and spices, it’s best to add them in at the beginning of the cooking process so that they release their full amount of flavor and potency. After roughly 10 minutes of sweating, I added a whole butternut squash which I had previously peeled, seeded and cubed, a head of cauliflower which I roughly chopped, and two peeled and diced potatoes. I quickly sautéed the vegetables and then added in an entire carton of vegetable broth, covered the pot, brought the ingredients to a boil, and then reduced to simmer and cooked until all of the vegetables were very tender. I allowed the soup to cool slightly and then I blended it in batches to a very smooth purée and adjusted the seasoning as necessary.  If you are a recipe follower, click HERE for the complete version. This soup was so delicious, and quite creamy all thanks to the potatoes. It was the perfect meal to enjoy on a cold day, and especially after getting my teeth pulled.

The next soup I made was carrot and ginger soup, which was also puréed, and actually similar in taste to the butternut squash soup, but this time, I opted for fresh ginger root instead of ground ginger to give the soup more of a spicy ginger kick, and I swapped out potatoes for cashew cream. To make cashew cream, simply soak raw and unsalted cashews in water for at least 8 hours — you can also boil the cashews to expedite the process. Once soaked, drain the cashews and place them into the bowl of a food processor and begin to pulse, slowly adding water to create a cream consistency — this will add a luscious mouth feel to the finished soup and will also aid in the thickening process. This soup begins the same way as the other soup, by slowly sweating onions and garlic with salt and pepper in a large pot, but this time, fresh ginger root was also added. After the onions, garlic, and ginger have cooked for roughly 10 minutes, the peeled and cubed carrots are added and then sautéed for roughly 10 more minutes. Once sautéed, add vegetable stock, cover and bring the ingredients to a boil, then reduce to simmer and cook until the carrots are very tender. Once tender, allow the soup to cool slightly, then purée until smooth in a blender, return to the pot, add in the cashew cream, and adjust the seasoning as needed. Not only does this soup taste delicious, but the fresh ginger also gives your immune system a boost and could aid in the prevention of fall illness due to the colder temperatures. If you wanted to make this soup a little heartier, you could also add in red lentils for a boost of protein, fiber, and carbohydrates!

I really love soup. It’s one of the easiest things to make in advance and store in your refrigerator as a make ahead meal. Soup and stews are also an easy way to pack a ton of vegetables and nutrients into your diet, which is essential during the colder months to help keep your immune system strong and yourself healthy. A big pot of soup and can be thrown together in no time, with as few or as many ingredients as you desire. As a treat to yourself and your body, try experimenting with different soups this fall and winter. Your taste buds and immune system will definitely thank you!

Happy Fall,

Payton